Mass Rock Drill Patterns

Safety Precautions: You must read SDS, Safety Warning Sheet, Mixing Instructions and Data Sheet before using Dā-mite®.

Daigh Company must be consulted if drilling hole diameters 2" or larger due to the increased potential risk of a "blow-out".
Drill Pattern for rock with with 1 free face 2.5 inch holes
Drill Pattern for rock with with 1 free face 1.75 inch holes (10x hole diameter spaces/18 inch c/c)
9 ft x 12 ft rock excavation

Approx 14 ft deep with one open face. Presplit 3 sides of perimeter on 9 inch c/c filling every other hole, production holes on 1.5 x 1.5 on a diagonally oriented grid.

Typically the "presplit" holes are set up so they are 1/2 the distance apart as the holes in the mass area. The hole spacing used is a ratio of the hole diameter and usually initial ratio in harder rock is 10 times diameter. For 2.5 inch hole that is approximately 2 ft centers. 13/4" holes would be at 1.5 ft centers with presplit at 9" (10x hole diameter x 1.75).
Trench Rock Drill Pattern
Typical section 1.75 inch hole 20ft x 8ft x 7 to 8 ft of rock.

Drill 1ft below grade.

Staggered Pattern with Pre split on sides. Pre-split holes are 1/2 distance apart from holes in middle of trench. Every other pre split hole is filled. If possible drill pre split ahead of center of trench and load earlier which helps isolate the rock to be broken. Because there usually is a much longer distance to the face in trench rock, breaking time can be slower. It may help to try to drill a channel in the shape of a "T" or "X" in the rock to create additional faces. The most critical areas of a trench are the sides and then the centerline where the pipe. Some trench rock will dig, however the harder the rock and the more massive it is, the more that impact will help loosen the rock as it is fractured helping speed removal. Also the teeth on a bucket may not be able to catch the rock at a crack, which helps break it loose.

Narrow trenches in hard rock can be very hard to do. Usually the rock will not break outside the limits of the holes. Make sure the trench is wider than a trench box if it has to go in the hole. As the holes may have some deviation in them from drilling it is wise to make the trench a bit wider than the box or bucket so that they will not get hung in a tight area.
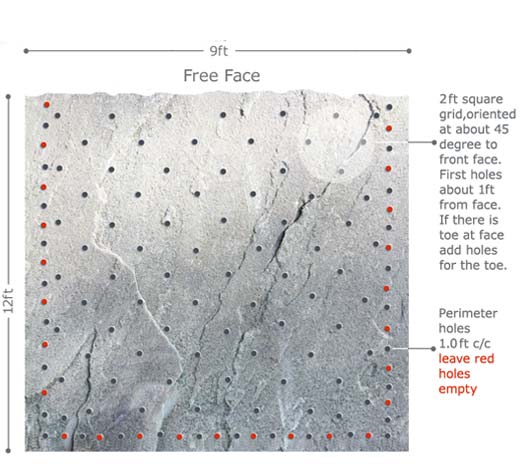
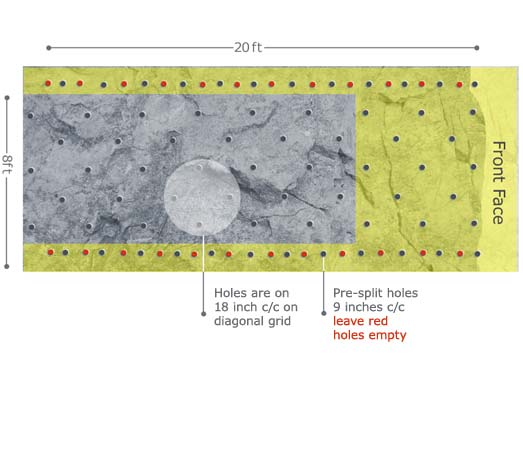
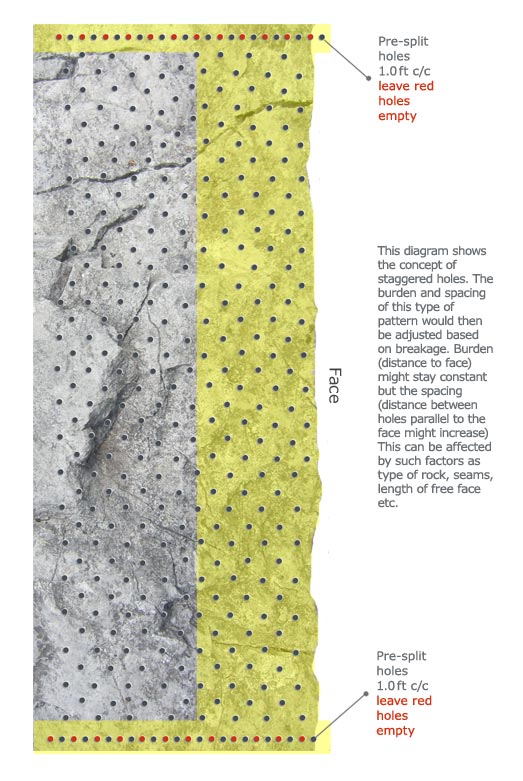
Mass Rock Staggered Hole Pattern
This example shows a situtaion where there is a large area of mass rock, but it still has defined sides. Those sides should have a presplit line drilled to help outline the area to be removed. As a rule Rock Splitting Mortar will usually not break beyond the outside holes and having a "pre split" type outer boundary drill line helps define that cut line. Also if there is a "back line" to the excavation it should also have "pre split" line.

Lay out holes based on bottom footprint of rock, and be sure and consider the toe area, if necessary drill angled toe holes to help start a face. Lay the holes out so that if you drill toe holes they do not intersect the vertical holes. The toe area acts as a brace and can make breaking difficult until it is removed.

Fill holes in yellow area first, and then fill next area etc, it does not hurt to fill only five to seven burden holes back from a face at a time, delaying filling by 6 to 8 hours. However, it does not really hurt to load further back. The Rock Splitting Mortar will start expanding and stress the rock, and as relief develops, the cracking will show up more. If an area seems to be bound, going back over it with empty relief holes in a line between a diagonal line of holes has helped free up an area. If you think the holes are not working well enough it is better to add new holes with product, the product in the existing holes is working it and it is better to compliment existing holes.